Langflow Integration
Overview
Section titled “Overview”Langflow is an open-source UI for LangChain, providing a visual way to build complex AI workflows by connecting components in a node-based editor. It allows users to experiment with language models, document loaders, and agents without coding.
Key Features
Section titled “Key Features”- Visual Flow Editor: Drag-and-drop interface for building LangChain applications
- Component Library: Extensive collection of pre-built nodes
- Real-time Testing: Test your flows as you build them
- Export Options: Export flows as Python code or JSON
- Custom Components: Add your own components to extend functionality
Use Cases
Section titled “Use Cases”- Building RAG (Retrieval-Augmented Generation) systems
- Creating autonomous AI agents with tool access
- Developing question-answering systems over custom data
- Prototyping complex LLM workflows before coding
- Teaching LangChain concepts visually
Setup Instructions
Section titled “Setup Instructions”-
Install Langflow
- Option 1: Using pip
Terminal window pip install langflowlangflow run - Option 2: Using Docker
Terminal window docker pull langflow/langflowdocker run -p 3000:3000 langflow/langflow - Option 3: Using uv
Terminal window uv pip install langflowuv run langflow run
For details on the installation options, check the Langflow Getting Started Guide.
- Option 1: Using pip
-
Access the Langflow UI
- Open your browser and navigate to
http://localhost:3000or any other port you assigned.
- You should see the Langflow interface with a blank canvas and component library on the left side.
- Open your browser and navigate to
-
Create a New Flow
- Click on “New Flow” to create a blank canvas
- Name your flow (e.g., “Custom LLM Integration”)
-
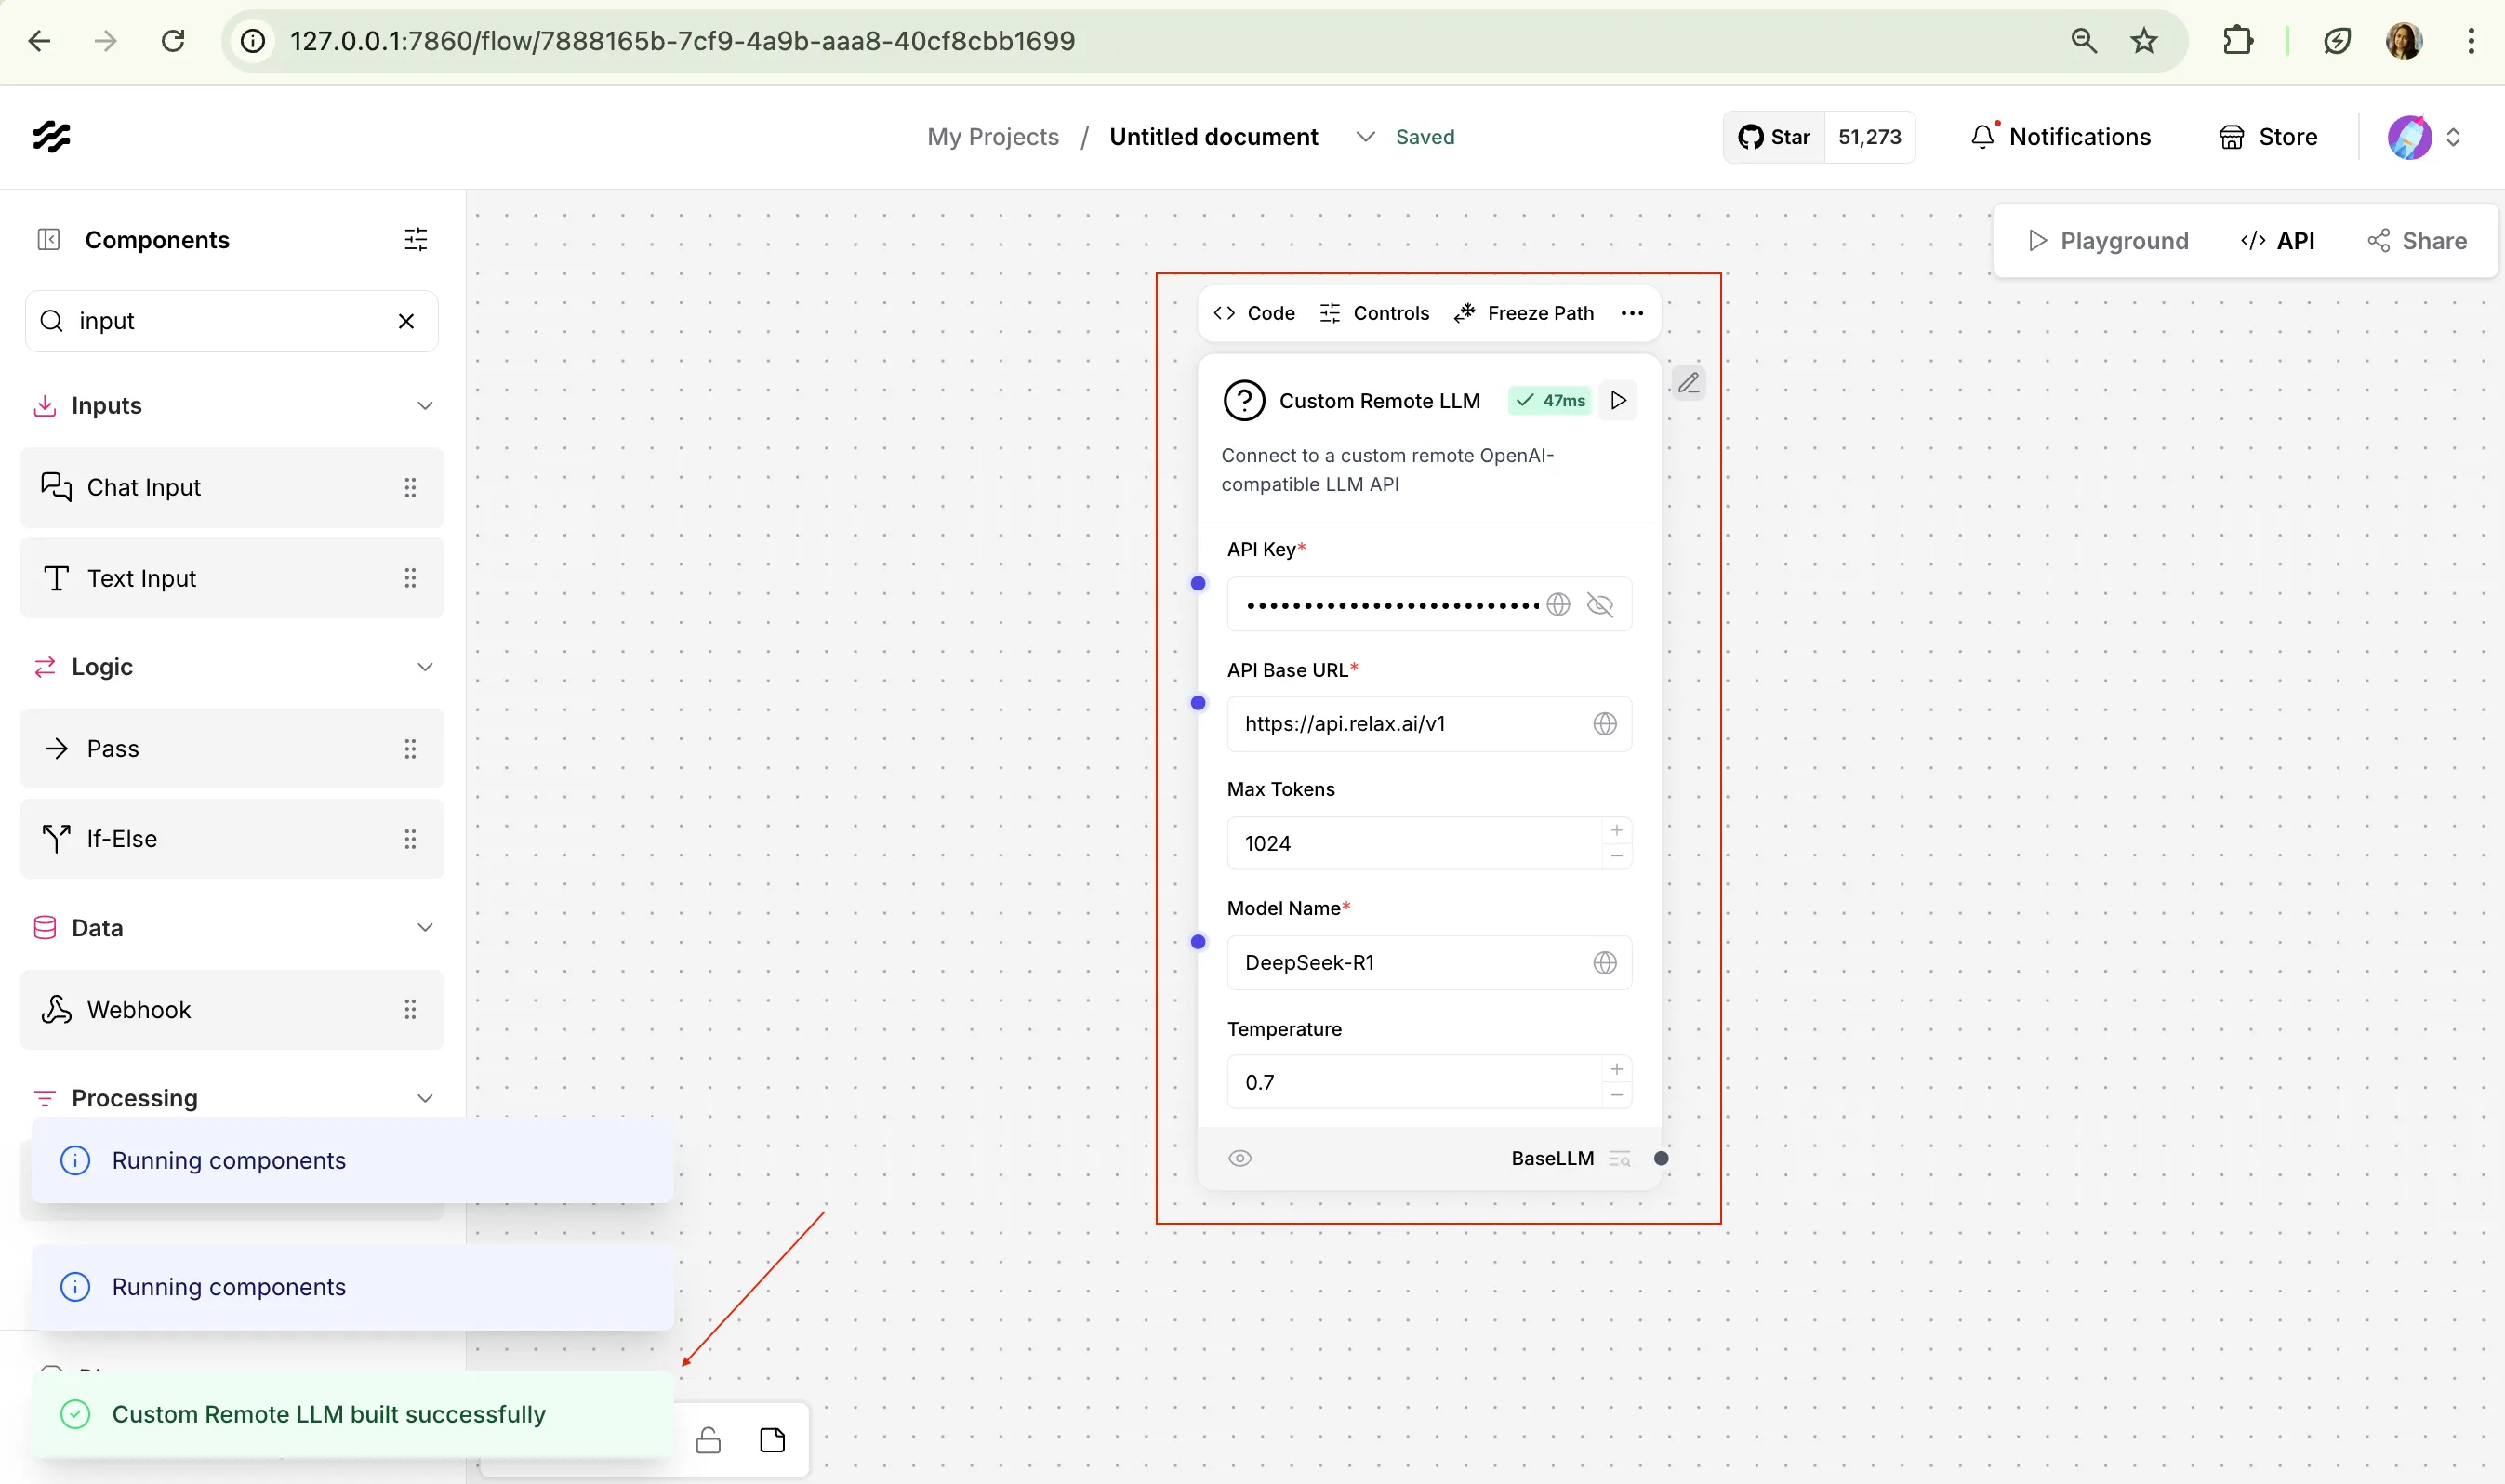
Create Custom Component
- In the components panel on the left, select
+ New Custom Component - Edit the code for the custom component, replace it with below code to setup a BaseLLM for relaxAI endpoint.
from langchain.llms import OpenAIfrom langchain.chat_models import ChatOpenAIfrom pydantic.v1 import SecretStrfrom langflow.base.models.model import LCModelComponentfrom langflow.field_typing import LanguageModelfrom langflow.field_typing.range_spec import RangeSpecfrom langflow.inputs import BoolInput, DictInput, DropdownInput, IntInput, SecretStrInput, SliderInput, StrInputfrom typing import Dict, Any, Optional, Listclass CustomRemoteLLMComponent(LCModelComponent):display_name = "Custom Remote LLM"description = "Connect to a custom remote OpenAI-compatible LLM API"icon = "Robot"name = "CustomRemoteLLM"# Define available models for your custom APICUSTOM_MODEL_NAMES = ["Llama-4-Maverick-17B-128E","DeepSeek-R1-0528"# Add more models as needed]inputs = [*LCModelComponent._base_inputs,IntInput(name="max_tokens",display_name="Max Tokens",advanced=True,info="The maximum number of tokens to generate. Set to 0 for unlimited tokens.",range_spec=RangeSpec(min=0, max=32000),value=1024,),DictInput(name="model_kwargs",display_name="Model Kwargs",advanced=True,info="Additional keyword arguments to pass to the model.",),BoolInput(name="json_mode",display_name="JSON Mode",advanced=True,info="If True, it will output JSON regardless of passing a schema.",),DropdownInput(name="model_name",display_name="Model Name",advanced=False,options=CUSTOM_MODEL_NAMES,value=CUSTOM_MODEL_NAMES[0],),StrInput(name="base_url",display_name="API Base URL",advanced=False,info="The base URL for your custom OpenAI-compatible API",value="http://api.relax.ai/v1",required=True,),SecretStrInput(name="api_key",display_name="API Key",info="The API Key to use for authentication",advanced=False,required=True,),SliderInput(name="temperature",display_name="Temperature",value=0.7,range_spec=RangeSpec(min=0, max=1, step=0.01)),SliderInput(name="top_p",display_name="Top P",value=1.0,range_spec=RangeSpec(min=0, max=1, step=0.01),advanced=True,),SliderInput(name="frequency_penalty",display_name="Frequency Penalty",value=0.0,range_spec=RangeSpec(min=-2.0, max=2.0, step=0.01),advanced=True,),SliderInput(name="presence_penalty",display_name="Presence Penalty",value=0.0,range_spec=RangeSpec(min=-2.0, max=2.0, step=0.01),advanced=True,),IntInput(name="seed",display_name="Seed",info="The seed controls the reproducibility of the job.",advanced=True,value=1,),IntInput(name="max_retries",display_name="Max Retries",info="The maximum number of retries to make when generating.",advanced=True,value=5,),IntInput(name="timeout",display_name="Timeout",info="The timeout for requests to the API in seconds.",advanced=True,value=60,),BoolInput(name="streaming",display_name="Streaming",info="Whether to stream the response.",advanced=True,value=False,),]def build_model(self) -> LanguageModel: # type: ignore[type-var]api_key = SecretStr(self.api_key).get_secret_value() if self.api_key else Nonebase_url = self.base_urlmodel_name = self.model_nametemperature = self.temperature if self.temperature is not None else 0.7max_tokens = self.max_tokens or 1024model_kwargs = self.model_kwargs or {}json_mode = self.json_modetop_p = self.top_pfrequency_penalty = self.frequency_penaltypresence_penalty = self.presence_penaltyseed = self.seedmax_retries = self.max_retriestimeout = self.timeoutstreaming = self.streaming# Create a dict of kwargs to pass to the modelmodel_params = {"model": model_name,"base_url": base_url,"api_key": api_key,"temperature": temperature,"max_tokens": max_tokens if max_tokens > 0 else None,"top_p": top_p,"frequency_penalty": frequency_penalty,"presence_penalty": presence_penalty,"seed": seed,"max_retries": max_retries,"request_timeout": timeout,"streaming": streaming,**model_kwargs,}# Check if we're using a chat model (based on model name or other criteria)if any(chat_model in model_name.lower() for chat_model in ["chat", "gpt", "claude"]):# Initialize a ChatOpenAI for chat modelsoutput = ChatOpenAI(**model_params)# If JSON mode is enabled, bind the response formatif json_mode:output = output.bind(response_format={"type": "json_object"})else:# Initialize an OpenAI for completion modelsoutput = OpenAI(**model_params)return outputdef _get_exception_message(self, e: Exception):"""Get a message from an OpenAI exception.Args:e (Exception): The exception to get the message from.Returns:str: The message from the exception."""try:from openai import BadRequestErrorexcept ImportError:return Noneif isinstance(e, BadRequestError):message = e.body.get("message")if message:return messagereturn None- Click “Save” to create the custom component and run it to test the connection with the correct input of
RELAX_API_KEY. - Save the relaxAI Custom component to use in your build flows.
- In the components panel on the left, select
-
Set Up your sample flow
- Select a agent/tool template and use that or create a custom flow.
- Drag the custom component you created onto the canvas
- Make sure to replace the llm with the custom component you created above.
Below is a sample blog writer agent flow that uses the custom component.
-
Set Up Prompt Template
- Configure the PromptTemplate with your desired prompt
- Connect the PromptTemplate to your chat node
- Configure the other necessary components as per the requirement of your agent/application.
-
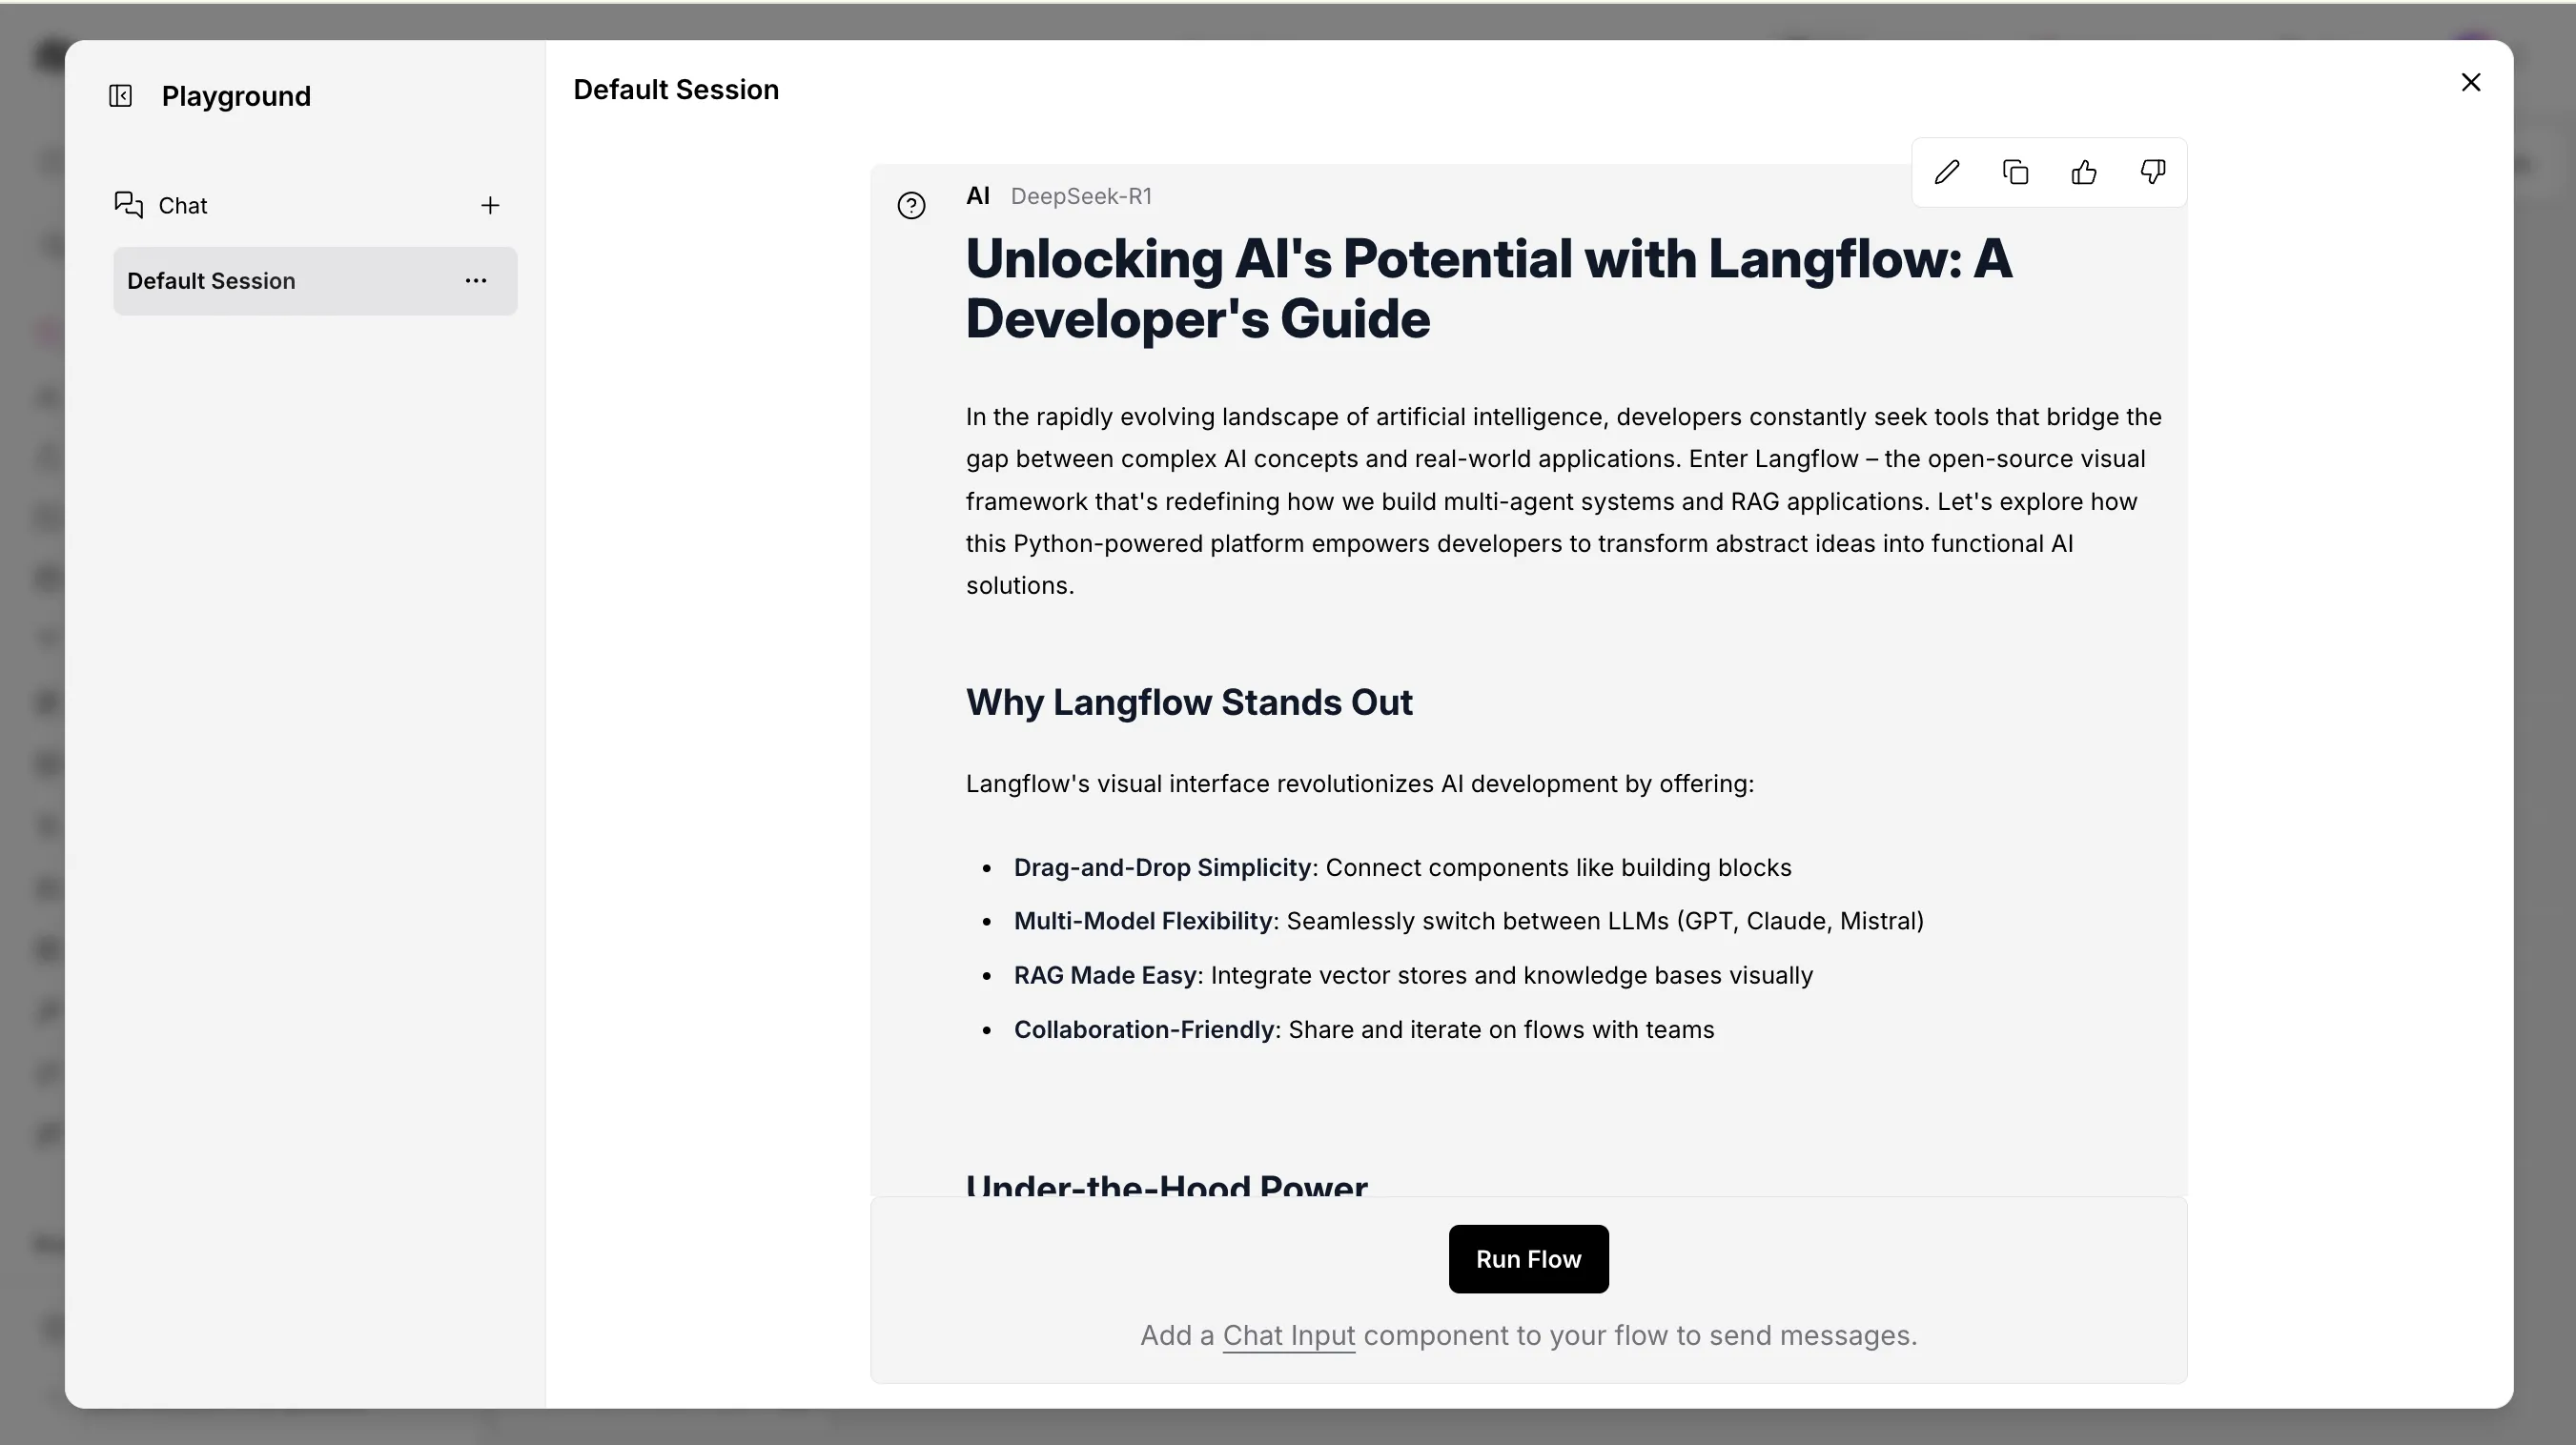
Test Your Flow
- Click the “Build” button to compile your flow
- Navigate to the “Playground” panel on the right
- Enter a test message and click send
- Verify that your custom LLM is responding correctly
-
Save and Export
- Click the “Save” button to save your flow
- Optionally, use “Export” to download the flow as Python code or JSON
Advanced Configurations
Section titled “Advanced Configurations”- Creating Complex Flows:
- Add document loaders to incorporate external data
- Implement memory components for persistent conversations
- Use vector stores for RAG implementations
- Custom Components:
- Create custom components with the Component Builder
- Import external Python packages for specialized functionality
- Agents Setup:
- Combine LLM, Tools, and Agent components
- Configure tool access and reasoning capabilities
- Create autonomous systems that can perform tasks
Code Example
Section titled “Code Example”You can use your custom agent/tool as an API, below is an example of using out blog writer flow via curl.
curl -X POST \ "http://127.0.0.1:7860/api/v1/run/11de87e7-8a38-4d69-ab74-debcd6566336?stream=false" \ -H 'Content-Type: application/json'\ -d '{"input_value": "message", "output_type": "chat", "input_type": "text", "tweaks": { "ParseData-a2ZR0": {}, "Prompt-tjZKS": {}, "TextInput-XCQZW": {}, "ChatOutput-DhGYs": {}, "URL-jYZhf": {}, "CustomRemoteLLM (IAY4J)-aboXL": {}}}'Troubleshooting Tips
Section titled “Troubleshooting Tips”- If components aren’t connecting properly, check that output and input types match
- For API connection issues, verify your API key and endpoint URL
- Use the built-in debugging tools to see the data flow at each step
- If your flow becomes complex, consider breaking it into multiple smaller flows